skip to main |
skip to sidebar
What have I learned from all these unexpected occurrences in Ubuntu—such as when the OS refuses to boot? Finding for solutions to my predicaments in the Internet often made me discover new techniques or terms used in Linux. Take for example, Wubi, I didn't pay so much attention to it even if I have used it to install Ubuntu from a CD.
 Wubi (Windows-based Ubuntu Installer) is an official Ubuntu installer for Windows users that can install and uninstall Ubuntu as any other Windows application. Simply put, Wubi is the installer for those who want to experiment and get acquainted with Ubuntu without the need of disk partitioning or formatting—Wubi installs Ubuntu within a file in the Windows file system just like any Windows program.
Installing Ubuntu inside Windows XP using wubi.exe is fast and easy—unlike Windows XP which took me two hours—it only takes less than thirty minutes. I must admit though the first time it took longer than that to install because I was doing it the wrong way.
For more info:
https://wiki.ubuntu.com/WubiGuide
http://en.wikipedia.org/wiki/Wubi_%28Ubuntu_installer%29
http://zenit.senecac.on.ca/wiki/index.php/Install_Ubuntu_While_Running_MS_Windows_%28WUBI%29
 If I can access Windows XP files from within Ubuntu Lucid Lynx, can I access Ubuntu files from within Windows XP?
My PC runs on a dual boot system with Ubuntu installed inside Windows XP—the former installed in an external USB hard drive with NFTS partitions, and the latter in the internal hard drive. With Ubuntu not booting all my files are gone. Fortunately, there are tools that can access Linux file systems from within Windows XP and with these tools a user can scavenge the files and salvage the usable materials.
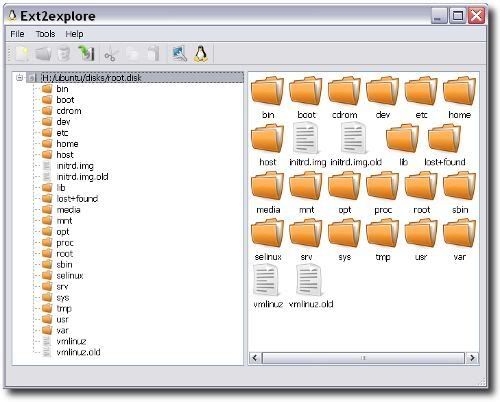
Linux uses a different file system; it's called the extended file system. Extended file system is to Linux as NFTS (or FAT) is to Windows. The default file system of Lucid Lynx is ext4; ext, ext2, and ext3 are the other members of this system. One program that can read ext4 is ext2read. This is the software I used to recover Ubuntu files from within Windows.
Ext2read is an executable that runs on Windows and can read and view files inside an ext2, ext3, or ext4 file system, and save them inside Windows. A screenshot of the program is shown below.

You can get ext2read at the following:
http://ext2read.blogspot.com/
http://sourceforge.net/projects/ext2read/
Just as I thought my Ubuntu inside Windows was working fine and nothing could go wrong, as I tried to boot into Ubuntu the screen briefly flashed with
error: unknown command 'loadfont'
error: file not found
and the screen returned to the boot screen menu . Choosing to boot into Ubuntu again only repeated the process. What made Ubuntu to behave like this? Some users point to an update as the cause.
One solution to this problem requires editing the grub.cfg which didn't work for me since I couldn't save the file. I have tried all the solutions and suggestions found in Ubuntu Forums but nothing worked. There is only one way to resolve this problem and that is to reinstall Ubuntu which means discarding all my personal files. However, there are two ways to recover those files and these are:- Copy the root.disk file from the Ubuntu folder in Windows or
- Use a software that can retrieve files from within Windows,
Installing Ubuntu inside Windows is easy using Wubi.exe, so I could copy the root.disk file, reinstall Ubuntu, and replace the new root.disk with the old one; this method is fine as long as the root.disk is not corrupted which already is since it wouldn't boot. The best option is explore the root.disk file from within Windows and copy whatever files I could save.
On the next three or more posts I will write down how I experimented with reinstalling Ubuntu using wubi.exe the Linux-newbie way and how I was able to recover my files from the unresponsive Ubuntu.
Ubuntu's Firefox default setting is just annoying: A single click in Firefox address or search bar does not highlight the entry.
Here are the steps to configure Firefox to highlight the entry in the address or search bar.
- In Firefox address bar, type about:config and press Enter.
- Click the “I'll be careful, I promise!” button.
- In the Filter box type browser.urlbar.clickSelectsAll.
- Under Preference Name, double-click browser.urlbar.clickSelectsAll to set it to “true” (or right click and select toggle).
- Close about:config.
Note: If the address or search bar does not highlight on single click, restart Firefox.
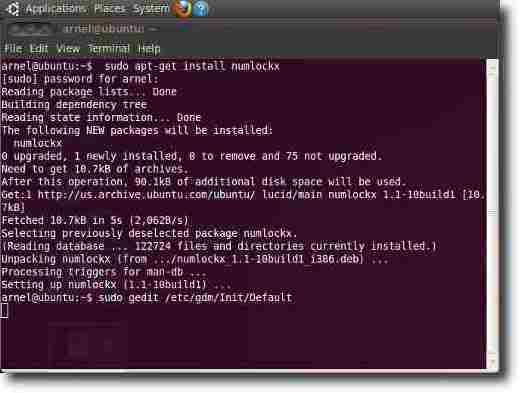
I am not comfortable with Ubuntu when changes are to be made through the use of the Terminal. Take for example how to enable the number lock in Ubuntu; to enable number lock you have to write codes in the terminal. Writing codes in Linux is my weakness; thankfully there are plenty of resources that can be found in the Internet to solve every Linux problem.
Here are the steps to enable the number lock key.
1. Click Applications > Accessories > Terminal. A terminal window opens.
2. Type the following code in the terminal and press Enter.
sudo apt-get install numlockx
3. Enter your password when prompted and press Enter.
4. A series of codes run through, wait till the line shows: user_name@ubuntu:~$
 5. Type the following code and press Enter. A gedit window should open.
sudo gedit /etc/gdm/Init/Default
6. Add the following code before the line exit 0 which is at the end of the code.
if [ -x /usr/bin/numlockx ]; then
/usr/bin/numlockx on
fi
 7. Click Save in the gedit, and close the gedit and terminal windows.
To check if this works, turn on the numlock key and restart Ubuntu. If you turn it off before restart, it will only be turned on during logon and turns itself off once Ubuntu is running.
Reference: https://help.ubuntu.com/community/NumLock
Most of us are guilty of this: opening an executable (.exe) without reading the readme instructions for the file.
But there are .exe files that need no double-clicking.
This one made me looked dumb—GIMP’s Save for Web plugin. After extracting the zipped folder of its contents, I opened webexport.exe only to be greeted with a prompt that says that the application has failed because libgdk-win32-2.0-0.dll was not found. This kind of warnings in Windows always freaks me out.
The fact is that, the webexport.exe file needs only to be copied to a personal plugins folder in GIMP—there is no need to double-click it, hence the prompt. Copy webexport.exe and paste it to C:\Documents and Settings\\.gimp-2.6\plug-ins and it’s done.
The screenshot below shows the Save for Web option in GIMP’S File menu once webexport.exe is pasted in the plugins folder.

The Save for Web plugin can be downloaded from GIMP Plugin Registry.
My PC failed to boot into Windows XP or Ubuntu after installing the complete update for Lucid Lynx Gnome (Ubuntu inside XP). With so many attempts to restart, I always get:
Error: no such device: 658965p2-8fg5- . . .
grub rescue>
The best solution
Internet search results showed that this issue of “deleted grub(?)” has been in Lucid Lynx since before it was officially released. To new Linux users like me with little understanding on writing commands, a boot failure is terrifying.
Fortunately, a discussion on restoring the grub bootloader can be found in Ubuntu forums. Ubuntu forums has solutions to restoring XP and Ubuntu—including Vista and Windows 7.
I followed the “How to restore the Windows XP bootloader” method. I booted the PC using the XP installation CD and waited to the part where it asks me to install or repair XP. The following is the procedure I took.
- Press “r” for repair.
- Type 1, when prompted which Windows installation to logon to (1: C:\WINDOWS).
- Type the Administrator password. This was tricky. I typed my logon password but it was rejected. I hit Enter instead, which means the Administrator has no password.
- Type “fixmbr” in the new command line. Ignored the scary warning that the current hard drive would become inaccessible.
- Type “y” for yes to confirm to write a new MBR.
- Type “exit” in the new command line after a new MBR is written.
- Reboot PC.
Problem solved!
Reference: http://ubuntuforums.org/showthread.php?t=1014708