skip to main |
skip to sidebar
Most of us are guilty of this: opening an executable (.exe) without reading the readme instructions for the file.
But there are .exe files that need no double-clicking.
This one made me looked dumb—GIMP’s Save for Web plugin. After extracting the zipped folder of its contents, I opened webexport.exe only to be greeted with a prompt that says that the application has failed because libgdk-win32-2.0-0.dll was not found. This kind of warnings in Windows always freaks me out.
The fact is that, the webexport.exe file needs only to be copied to a personal plugins folder in GIMP—there is no need to double-click it, hence the prompt. Copy webexport.exe and paste it to C:\Documents and Settings\\.gimp-2.6\plug-ins and it’s done.
The screenshot below shows the Save for Web option in GIMP’S File menu once webexport.exe is pasted in the plugins folder.

The Save for Web plugin can be downloaded from GIMP Plugin Registry.
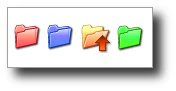 Changing the colors of my folders I thought would look nice in my PC; what I didn’t realize was that it would speed up my work. With customized folder icons, I can quickly pinpoint the specific folder I want to open.
With so many folders colored yellow in my PC, sometimes searching for a particular folder is like searching a needle in a haystack. One way to change the folder icon is to right-click the folder and choose Properties. In the Properties dialog box, click the Customize tab and click the Change Icon button. A Change Icon dialog box opens and select from the list of icons or you can browse to the folder where your icons are saved. Take note that only icons with .ico extensions can be used.
I have these icons with .gif extensions and what I did was to convert them to .ico using GIMP.
Another way of changing the folder icon is to simply change its color. With this method I use a free software called Folder Marker. Folder Marker is a helper which can mark folders by priority (high, normal, low), by degree of work complete (done, half-done, planned) and by the type of information contained in the folder (work files, important files, temp files, private files). When installed, you can customize or colorize—if this is the right term—your folders by right-clicking a folder and choosing Folder Marker among the options.
I was trying to add a drop shadow on an image using GIMP and was surprised that some options in the menu were grayed-out when working with GIF files. First, I thought GIFs do not work on GIMP. Searching on the Internet, I found out that GIF uses indexed color and not RGB.
For those who have this kind of concern, fret no more. When working with a GIF image using GIMP, choose Image > Mode > RGB. This will enable the options.
For GIMP 2.6.6 Users
3D-effect
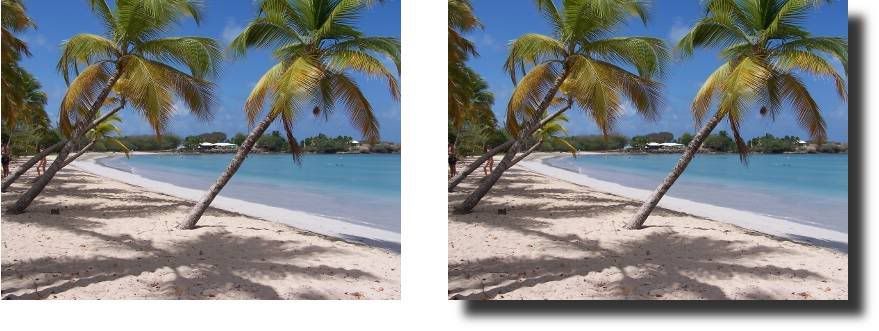
Web images without drop shadows appear flat and bland but with drop shadows, images become alive and dynamic. To illustrate, take a look at the two pictures below.
 Drop shadows on every picture in this blog were added using GIMP. GIMP is the GNU Image Manipulation Program; it is a free software used to process digital photographs and other graphics for such tasks as photo retouching, image composition and image authoring.
I’ll show you how to create or add drop shadows in images using the free software GIMP.
Add the Drop Shadow
Open GIMP. Choose File > Open. Browse to the folder where the image to be processed is saved. Select the file and click Open; the image is displayed in the main window.
Choose Filters > Light and Shadow > Drop Shadow. A Script-Fu: Drop Shadow dialog box opens similar to the one shown below.
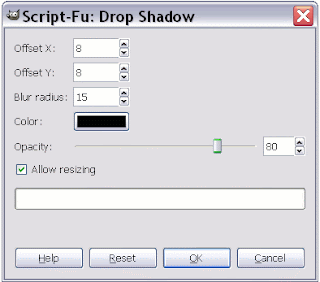 Offset X: Places the horizontal shadow X pixels in relation to the image. This value can be set to negative (Ex. –9) and places the shadow at the left side of the image.
Offset Y: Places the vertical shadow Y pixels in relation to the image. This value can be set to negative (Ex. –9) and places the shadow above the image.
Blur radius: Lower values sharpen the shadow, while higher values unsharpen or smear the shadow. This gives a realistic appearance to the shadow.
Color: Click to select a shadow color.
Opacity: 0 sets shadow to full transparency, 100 sets the shadow to full opacity.
Allow resizing: Leave this box checked.
Reset Button: Resets value to default.
After making some changes (or no changes) in the Drop Shadow dialog box, click the OK button.
Save the file with a white background
If you are satisfied with the result, choose Image > Flatten Image. Then choose File > Save As . . . and follow the instructions on saving the file. The image saved will have a white background.
Save the file with a transparent background
If you want an image with a transparent background, then save the image in PNG-24 (or GIF format). After clicking the OK button on the Drop Shadow dialog box, choose Image > Merge Visible Layers—a Merge Layers dialog box opens, click Merge. Then choose File > Save As . . .
Some facts about BMPs, GIFs, PNGs, and JPEGs
GIF and PNG files can have transparent areas but not JPEG and BMP files. For other files supported by GIMP, you may have to experiment whether these files can have transparent areas.
Take note that some files such as transparent PNG may not be supported by some (earlier?) browsers.